|
 |
 |
| Game Interface |
| Main Screen |
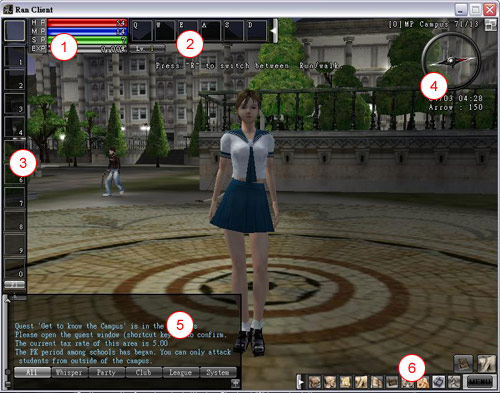
1. |
Character's Status Window |
|
HP: |
As HP becomes "0", the character will die. Before the HP drops to "0", HP can be restored by taking the HP Potion or by taking a rest. |
|
MP: |
Everytime you use skill your MP decreases.Players can’t use their skills with insufficient MP. Take a rest or take MP Potion restore your MP. |
|
SP: |
Attacks require Strength. Continuous attacks consume more SP. Players can't attack with insufficient strength. Strength will be restored by taking SP Potion or by taking a rest. |
|
EXP: |
Experience points (in %) a character gains in respective level. You can gain EXP by fight with enemies and by completing quests.
As EXP reaches to 100%, character advances to the next level.
|
|
|
|
2. |
Tools Shortcut Bar |
|
- Place potions and items in the Tools Inventory Window for shortcut.
- Use the left button of mouse to select all the potions and items in the Tools Inventory Window, place them in the Tools Shortcut Bar.
- There are six shortcut keys Q, W, E, A, S, D available.
- To cancel Tools Shortcuts, just right click on the respective tool's shortcut.
|
|
|
|
3 |
Skills Shortcut Bar |
|
- For immediate use, place the skills from the Skills Window into the Skills Shortcut Bar (Only Initiative Skills are allowed here).
- Click left button of mouse to select all the skills in the Skills Window, and place them in the Skills Shortcut Bar.
- The Shortcut keys are available from 1~ 0
- Cancel the Skills Shortcuts by right click on the respective tool's shortcut.
|
|
|
|
4. |
Compass and Grid Reference |
|
- Confirm character's current position by using maps and grids.
- The game date and time are shown in the bottom of the compass.
|
|
|
|
5. |
Chat Window |
|
- There is a chat window for text input/output and message display.
- An interface which allows players to communicate and interact with other players in the game.
- Use [Enter] button or right button of mouse to activate the chat window, press [Enter] button to send out the messages.
|
|
|
|
6. |
System MENU/Window Menu List |
|
- Display diagram list and system settings MENU in each window.
- System MENU includes 4 options: server, system functions, online guide and exit game.
- In the Window Menu List it includes Tools Inventory Bar (I), Character (C), Skills (K), Team (P), Club/Gang (G), Missions (T), Friends (F), Map (M), Bank (B), and Run/Walk (R) all 10 items.
|
|
| Inventory |

 Inventory Window short-cut "I" key Inventory Window short-cut "I" key
|
 1. Inventory Bar 1. Inventory Bar
Left-click on the equipment that you want and drag it to the Inventory Bar for use.
2. Tools Bar
- There are 24 slots in the inventory. Each item will occupy one slot and most of the potions and items will overlap in the same slot.
- Expansion slots can be purchased; Slots are limited to 18 slots. (Not displayed at the moment).
- There is a limit in space, but there is no weight limit.
3. Money
Total Rane (currency in RAN world) a player has currently.
|
| Character's Info |

 Character's Info Window short-cut "C" key Character's Info Window short-cut "C" key
|
 1. Ability 1. Ability
- There are 5 ability points: Power, Dexterity, Spirit, Vitality and Stamina.
- 3 points will be given to characters for each succeeding level to distribute as desired; players can distribute ability points base on equipment and skill.
- After left-click on the Ability point’s icon, the leveling points can be distributed.
2. Status
- The differences in each value are base on the character’s level, ability points and equipment in inventory.
- Status points will determine whether you win or lose in fights with enemies and other players.
3. Resistances
Show resistance to special effects such as Paralyze, Petrify, Burning, Freeze, Poison.
4. Training Club Attributes
Character's Training Club Info |
|
| Skills |

 Skills Window short-cut "K" key Skills Window short-cut "K" key
|
 Point at Skills icon with the mouse to confirm the requirements for earned skills. It confirms if the current characters’ attributes are sufficient to learn a particular skill. Point at Skills icon with the mouse to confirm the requirements for earned skills. It confirms if the current characters’ attributes are sufficient to learn a particular skill.
The red section in the menu shows the ability value character lacks.
Skills define the type of weapon that will be used. Character’s current equipment and weapon also affect skills being used.
Learning Skill Steps:
- Purchase or kill the monsters to obtain skill Manual.
- To fulfill the respective learning requirements (e.g. Skills Points, etc).
- Right-click on skill’s handbook to learn a particular skill.
- Confirm the skill mentioned in the Skills Window for usage.
- Base on character’s growth, use the skill points to strengthen specific skill, or learn other skills.
|
| Team |

 Team Window short-cut "P" key Team Window short-cut "P" key
|
Team, minimum of 2 people, maximum of 8 people.
- During the game, player can form their own Team to take on monsters.
- Base on the Team you are in, the EXP you gain will also differ even when killing the same monster.
- The EXP can be obtained from team attack. Points will be allocated automatically to each Team’s member base on the rules. Once a player goes too far away from the other Team’s members, he/she will not get share from Team’s EXP.
- The member who initiates the Team will become the Team leader, and the Team leader has the power to recruit, kick-out members and dismiss the Team.
- Members are free to quit their Team whenever they want.
|
| Club/Gang |

 Club/Gang Window short-cut "G" key Club/Gang Window short-cut "G" key
|
- Club/Gang Create Requirements: Character's level is Level 30 and possess 1 million Rane.
- Club/Gang Requirement: 5 members and above is needed to form a Club/Gang. Only Club/Gang Master can form a group and each member is required to apply for Club/Gang from the Student Director of their respective campus.
- Club/Gang Limitation: Characters from the same Campus, no limitation in terms of character's level.
- Club/Gang Master can recruit, kick-out and disband member from the Club/Gang. Club/Gang members can have their own unique nickname.
- For Club/Gang Leveling: Master must have sufficient points.
- Club/Gang badge: In "My Documents" folder create a *.bmp or *.tga 16x11 image. Then the Club/Gang Master will enter the file name in Group Window to complete setup.
|
| Task, Quests and Missions |

 Missions Window short-cut "T" key Missions Window short-cut "T" key
|
- Players receive different quests as their level increase.
- A quest includes Mission’s Name, Mission’s Guides, Mission’s Procedures, Mission’s Tips, Rewards, and etc.
- When quest is done, players will get specific rewards (Rane, equipment, experience points or skill).
|
| Motions Changes |

 Run/Walk short-cut "R" key Run/Walk short-cut "R" key
|
Use left button of mouse to select the icon to switch between running / walking. |
| System |

 System MENU short-cut "ESC" key System MENU short-cut "ESC" key
|
System functions include (Video), (Audio), (Play) settings |
|
|
| top |
 |
 |
XtraVision Interactive Entertainment Co., Ltd.
Copyright ©2009 XtraVision Interactive Entertainment All rights reserved. |
| |
|
|
|